MNIST手写字体识别实例

MNIST手写字体识别实例

1.步骤概要

  • 读取数据

  • 创建网络

  • 训练参数得到 [w1,b1,w2,b2,w3,b3](三层)

  • 准确度测试

2.具体实现

2.1 工具包

对图片进行可视化展示以及onehot编码

1
2
3
4
5
6
7
8
9
10
11
12
13
14
15
16
17
18
19
20
21
22
23
24
25
26
27
28
29
30
31
32
33
import torch
from matplotlib import pyplot as plt

# 画曲线
def plot_curve(data):
fig = plt.figure()
plt.plot(range(len(data)),data,color="blue")
plt.legend(["value"],loc = "upper right")
plt.xlabel("step")
plt.ylabel("value")
plt.show()


# 画图片
def plot_image(img,label,name):

fig = plt.figure()
for i in range(6):
plt.subplot(2,3,i + 1)
plt.tight_layout()
plt.imshow(img[i][0]*0.3081+0.1307, cmap = "gray" , interpolation = "none")
plt.title("{}:{}".format(name,label[i].item()))
plt.xticks([])
plt.yticks([])
plt.show()


#one hot编码
def one_hot(label,depth=10):
out = torch.zeros(label.size(0),depth)
idx = torch.LongTensor(label).view(-1,1)
out.scatter_(dim=1,index = idx,value=1)#dim=0按行填充dim=1按列填充
return out

2.2导入包

1
2
3
4
from torch import nn #网络模型
from torch.nn import functional as F #激活函数
from torch import optim #优化器
import torchvision #载入数据

2.3 下载并读取数据

1
2
3
4
5
6
7
8
9
10
11
12
13
14
15
16
17
18
19
20
21
#每个批次多少张照片
batch_size=512
# 1.读取数据
train_loader = torch.utils.data.DataLoader(
torchvision.datasets.MNIST("mnist_data/",train=True,download=True,
transform=torchvision.transforms.Compose([
torchvision.transforms.ToTensor(),
torchvision.transforms.Normalize(
(0.1301,),(0.3081,))
]))
,batch_size=batch_size,shuffle = False)


test_loader = torch.utils.data.DataLoader(
torchvision.datasets.MNIST("mnist_data/",train=False,download=True,
transform=torchvision.transforms.Compose([
torchvision.transforms.ToTensor(),
torchvision.transforms.Normalize(
(0.1301,),(0.3081,))
]))
,batch_size=batch_size,shuffle = False)

对训练数据进行可视化展示,查看图片

1
2
3
x,y=next(iter(train_loader))
print(x.shape,y.shape,x.min(),x.max())
plot_image(x,y,"image")
1
2
output:
torch.Size([512, 1, 28, 28]) torch.Size([512]) tensor(-0.4223) tensor(2.8234)

2.4 创建网络模型

1
2
3
4
5
6
7
8
9
10
11
12
13
14
15
16
17
class Net(nn.Module):
def __init__(self):
super(Net,self).__init__()
# wx+b
self.fc1 = nn.Linear(28*28,256)
self.fc2 = nn.Linear(256,64)
self.fc3 = nn.Linear(64,10)

def forward(self,x):
# x:[batch_size,1,28,28]
# h1 = wx+b 使用relu激活函数
x = F.relu(self.fc1(x))
# h2 = relu(W2h1+b2)使用relu激活函数
x = F.relu(self.fc2(x))
# 可以用softmax/means 这里没有使用h3=w3h2+b3
x = self.fc3(x)
return x

调用模型进行训练迭代

1
2
3
4
5
6
7
8
9
10
11
12
13
14
15
16
17
18
19
20
21
22
23
24
25
26
27
28
29
30
31
32
33
34
35
36
37
net=Net()
#[w1,b1,w2,b2,w3,b3]
optimizer = optim.SGD(net.parameters(), lr=0.01 , momentum = 0.9)

train_loss=[]


for epoch in range(3):
for batch_idx,(x,y) in enumerate(train_loader):
# x:[bztch_size(512),1,28,28],y:[512]
# print(x.shape,y.shape)
# break
# net只能接收[batch_size,feature][512,28*28]
#所以需要[512,1,28,28]=>[512,784]
x = x.view(x.size(0),28*28)
# =>[batch_size,10]
out = net(x)
# [batch_size,10]接近
y_onehot = one_hot(y)
# loss = mse(out,y_onehot)
loss = F.mse_loss(out,y_onehot)

#梯度清零,否则会累加
optimizer.zero_grad()
loss.backward()
#w' = w- lr*grad 梯度更新
optimizer.step()

train_loss.append(loss.item())

# 每10张打印损失值
#if batch_idx% 10 == 0 :
#print(epoch,batch_idx,loss.item())

#画出损失曲线
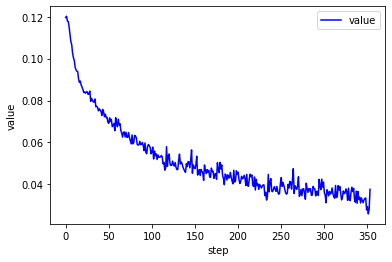
plot_curve(train_loss)
# 3.得到optimal [w1,b1,w2,b2,w3,b3]

2.5 准确度测试

1
2
3
4
5
6
7
8
9
10
11
12
13
14
15
16
17
18
#4.准确度测试

total_correct = 0
for x,y in test_loader:
x = x.view(x.size(0),28*28)
out = net(x)

# out:[512,10]=>pred:list[512] dim对应第1维10个中得最大索引位置
pred = out.argmax(dim=1)

#tensor 比较 相加 转化float item()将tensor转化为数字
correct = pred.eq(y).sum().float().item()
total_correct+=correct


total_num = len(test_loader.dataset)
acc=total_correct / total_num
print("test acc:" ,acc)
1
2
output:
test acc: 0.8814

2.6训练集与测试集数据展示

1
2
3
4
5
6
7
8
9
#训练集
x,y=next(iter(train_loader))
print(x.shape,y.shape,x.min(),x.max())
plot_image(x,y,"image")
#测试集
x,y = next(iter(test_loader))
out = net(x.view(x.size(0),28*28))
pred = out.argmax(dim=1)
plot_image(x,pred,"test")
1
2
output:
torch.Size([512, 1, 28, 28]) torch.Size([512]) tensor(-0.4223) tensor(2.8234)